Payza News Update – Payza payments are no more available in any part of the world since US authorities have shut Payza down for involvement in criminal activity. Payza has been charged for money laundering over $250 million.
Payza Reopening – Payza has promised to restart its services to the users apart from US residents. There is no confirmation of time and date. I will keep on updating regarding this issue, stay tuned, or contact me. In the meantime, you can use PayPal or Payoneer to receive payments.
Payza Review – Payza was one of the most used payment processors in the world next to PayPal. It’s a known fact that PayPal is the best payment processor to send and receive money from the bank account at low fees. But unfortunately, because of its strict terms, PayPal does not approve all the business accounts that wish to process over 10 payment per day. Payza is one of the best options for the companies to replace PayPal as the payment system is accepted almost all over the world and there are no strict terms like Paypal.
Coming to India, recently Payza has added a great new feature for Indian freelancers to withdraw money directly to the bank account in Indian currency INR(₹) and Payza is planning to add more features to expand their business in India. Read this full review about Payza India to learn how to make use of its features in India.
Payza India Reviews:
Payza is the second-best payment processor in India next to Paypal, which is a Payment option almost on all the MMO sites.
Now it is possible to withdraw money from Indian currency to the local bank account in a very simple way. Previously, we can only send the wire transfer to India(n) bank account, which has so many formalities and fees were higher.
You can store your money on the Payza wallet as long as you want and make use of it for the online purchase.
Payza India vs PayPal India:
In India, you cannot store your money in the PayPal wallet for over seven days or make a purchase directly using PayPal balance according to Indian reserve bank regulations. With Payza, there are no restrictions in keeping money on the Payza wallet and you can make use of it to repurchase products and services.
For example, if you receive $10 from a survey site or a Paid to click site to PayPal, you won’t have full control over the fund, and also you cannot use it for upgrading your PTC account or purchasing advertising devices. $10 will be automatically converted into INR and sent to the verified bank account within 7 days of money received.
In Payza, you can store that $10 in the wallet for years and it will not be auto-withdrawn. Moreover, you can use it to purchase services on any other site as per your wishes.
The second factor is the withdrawal fees. PayPal will charge no fees if you withdraw above ₹7000 and very little fees if less than ₹7000. Payza will charge you a fixed fee for all the transactions that are explained in the latter part. This is terrible news for startups and freelancers.
You can directly pay for service via PayPal using your Visa/Master debit/credit cards with low fees. But on Payza you have to add funds to your wallet only through wire transfer that charges minimum fees of $8 and you can use the funds added to your Payza wallet to purchase services & products.
Both Paypal and Payza are very secure. Payza acts bit smart than PayPal. If you sign in to your Payza account from a new computer (new IP and MAC address) you have to enter the verification code sent to your email inbox to log in successfully. Anyone can log into your PayPal account if they know the correct user ID and password.
The important point to be considered is that you can only receive a maximum of $500 inward transaction to a regular Indian Paypal account. Payza has no restrictions and you can send or receive an unlimited amount through the Payza account.
Hope now you’re aware of the pros and cons of PayPal and Payza in India. Now continue reading to learn the usage of Payza.
How to create a Payza India account:
Creating a Payza account is very simple as you do on other sites. Click here to create the Payza account.

Once you land the homepage of Payza, click the signup and choose to sign up for the personal account. The registration form might look similar to the image given above. Enter your correct name and email address. Set a password to your account and click get started.

Payza will email verifying if you’re the owner of the email ID. You must click the verification link to activate your account.
Then you will be asked to complete a basic profile, where you have to enter your address, employment, etc. Now it the time to verify your account.
How to verify and fully activate Payza India account:
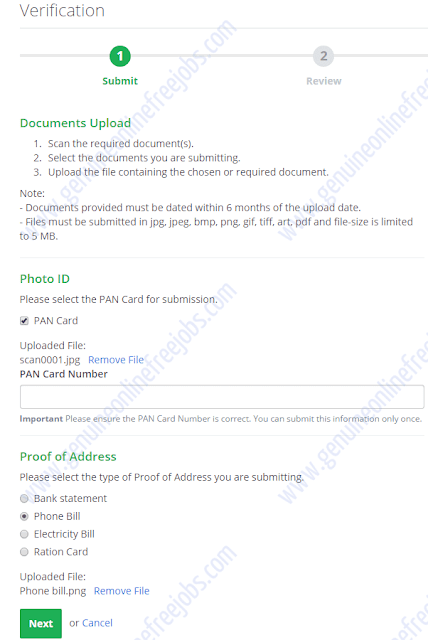
To enjoy all the features of Payza India services, the Payza team should verify your account. This can be done by adding a scanned copy Indian PAN card and a proof of address.
Look at the image given above, the screenshot of the verification page. I’ve added the PAN card copy and phone bill for proof of address. Bank statement, electricity bill, Ration card are the alternatives.
You must enter your PAN number in the box given under photo ID to confirm it and upload the scan copies of documents. Enter the PAN number correctly, which cannot be changed later. Click next to review the information you’ve entered. Check all the information once again and click confirm to submit the documents. Payza will confirm the document approval within 2 days from the time of submission.

I’ve received mail after two days that Payza has approved the documents. If your documents are not approved, just upload a scanned copy of alternatives or contact Payza for support.
After approval, we have full control over our account. Now we can send, receive funds through Payza with no limitations.
Linking Payza India account to Indian bank account:
The next important step is to link/adding your bank account details to connect it with the Payza wallet.

New users can find the “add bank account” button on the sidebar. Click it to add your bank account details.
Previously, it was possible to withdraw funds from Payza using wire transfer (fees – $15). We must enter the Swift – BIC Code of the beneficiary bank, which is a great headache. Getting details from government bank employees will be very hard because most of them are not aware of swift code. Also, we must submit several documents to the FOREX department of India if our account receives inward remittance.
But, now we can add bank details and receive funds as we do it on internet banking NEFT.

On add bank account page choose “Withdraw funds in local currency” and choose account type as Personal savings. Enter your first name, last name, and remember your name should match exactly to the name mentioned on the bank account.
Enter the bank account number & IFSC code of your bank and click next.

All the details will be listed again, as shown above. Check them more than once and click add bank account.
The Bank account has been added successfully and it should appear in your wallet – Bank accounts section as shown below.

Receiving funds and payments to your Payza account:
Receiving funds/payment to your Payza account is a one-step process. Give the email ID that you’ve used to sign up for the Payza account to the sender or enter it in the payment section of the sender site.
The sender can now send money to your Payza wallet with no further verification.

As you can see in the image given above, I’ve received $175.20 in my Payza account. With $5.38 deducted as transaction fees, the final amount deposited to my account was $169.82. The transaction fees were 2.90% + $0.30.

We can find the exact amount added after a fee deduction on account transaction history.
How to withdraw funds to your bank account on Payza:
Unlike Paypal, which has an auto-withdrawal feature that will send money automatically to our bank account with no user action, to withdraw money from Payza India there are few steps to be followed.

Click the withdraw funds link on the menu. The withdrawal services will be displayed, as shown above. Click bank transfer.
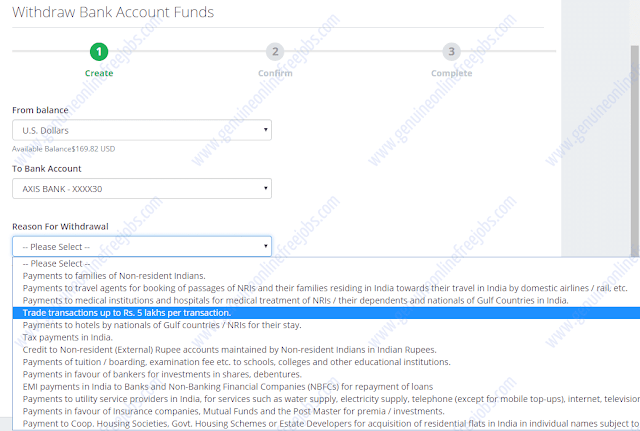
Now you must select the bank account linked and the reason for withdrawal, which is mandatory according to RBI rules. If you’ve received funds from freelance sites, PTC sites, etc select the reason as “Trade transaction up to ₹5 lakhs per transaction”.
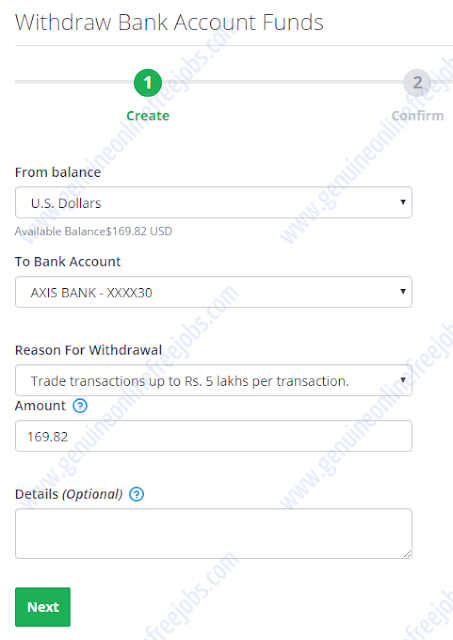
Enter details (optional) for future reference on transaction history. Click next to continue.

Now all the details will be listed as shown above. The currency conversion will be automatically applied and the final amount that you will receive in your (Indian) bank account will be given. Just confirm all the details.
Enter the transaction PIN and click withdraw. Now this transaction has to be approved by the Payza team only for the first time.

Once the transaction has been approved, the estimated deposit time will be displayed on your account, as shown above.
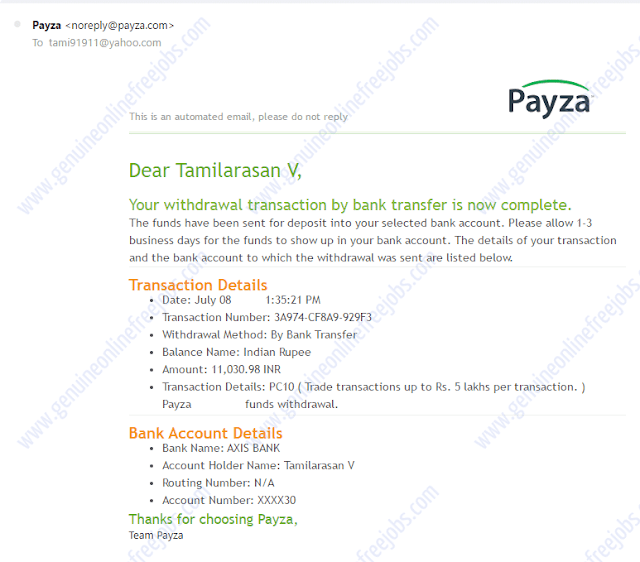
When the transaction is completed, you will receive a mail stating that they have completed the transaction and it might take up to 3 days to see funds on your bank account.

You will receive an SMS from the bank regarding the credit. if not you can check your bank account to see the transaction.
You might like this – How to Earn Bitcoin and convert into cash on Payza.
How to add funds to Payza India account:
If you wish to fill your Payza wallet from your bank account to make payments to services/products, you can send the wire transfer to Payza. Payza will charge fixed $8 for each deposit.
Click add funds on the menu to start.

Select currency, enter the amount to be deposited, and click next. Payza will guide you to send a wire transfer.

Log into your internet banking account and click outward remittance under the FOREX menu. Follow the instructions given by Payza to add a new Payee. Now Enter the amount (Currency conversion valid for a certain time) mentioned on Payza and send the amount.
Once the transaction is complete, it will display the funds on your wallet.
Payza India fee structure:
No fees will be charged for sending funds.
2.90% + $0.30 will be charged to receive funds.
2.90% + $0.30 + 2.5% [Currency conversion] will be changed to withdraw funds to an Indian bank account.
$8(might vary) + transaction fees will be applied to add funds to the Payza wallet.
Pros of Payza India:
- Trusted legitimate payment processor.
- No restriction or fees applied to store funds on the Payza wallet.
- Direct bank account withdrawal in local currency.
- No funds limit.
- Quick transfer.
- Substantial support.
- Transaction fees are fixed. A dynamic fee structure could be a headache.
Cons of Payza India:
Transaction fees are higher compared to PayPal.
$8 for the Wire transfer to add funds in the Payza wallet, which is bad news for small freelancers. If they have to add $10 to the Payza wallet, they have to send $18.
The currency conversion rate is less than PayPal and Payoneer.
Payza India Final Review:
Payza is the best payment processor to send and receive funds anywhere around the world. But unfortunately, Payza has been accused of criminal activity for making unauthorized cryptocurrency transactions. Payza must prove that they are legitimate to continue its services around the world. However, Payza might not be available for US residents.
In the future, after the restart, we can expect more features to be added to ease our work. You can make use of Payza with no hesitation as they are legitimate and provide instant world-class services.
Click here to sign up – Payza.
Payza supported online jobs – PTC sites, GPT sites, PTR sites, Survey sites, Captcha sites, BTC faucets.

